Israeli lentil salad — not tried yet

by Don  

Prep 10 minutes
Cook Time 1 hour

Ingredients

Lentils

  • 1 cup dried lentils
  • 2 cups water
  • 1 bay leaf
  • 1 tsp salt and more to taste
  • 1 onion
  • Olive oil

Dressing

  • ¼ cup olive oil
  • 1 tsp sugar
  • ½ cup chopped parsley
  • ¼ cup chopped mint
  • 1 large clove of garlic
  • Juice of 1 lemon
  • Juice of ½ orange

Method

  1. Pick over and rinse the lentils. Put them in a medium pan with the water and the bay leaf.
  2. Simmer until the lentils are tender, but don’t overcook and let them lose their shape. Depending on the age and variety, this may take from 30 to 60 minutes. Add salt only when they’re just underdone – cooked, but not quite done. Stir.
  3. When tasting proves that the lentils are cooked through, drain them of excess water and allow them to cool. Remove the bay leaf.
  4. While the lentils are cooling, chop the onion and sauté it until translucent in a little olive oil. Set aside.
  5. Blend all the dressing ingredients in a blender. Pour the dressing over the cooled lentils; stir the onions in.
  6. Cover and put aside for 1 hour before serving. Even better, leave it in the fridge overnight and serve the next day.

Wheat berry and mushroom pilaf, second attempt — Ninja Speedi

by Don  

Ingredients

  • 1.5 cups of dry wheat berries
  • 1 oz of dried, sliced shiitake mushrooms
  • 1.5 tsp of "Better than Boullion mushroom base

  • 6 oz of wood ear mushrooms
  • 2-3 tbsp of butter
  • 2 cloves of garlic, minced

Notes

  • Once I get the water amount and timing down right, this should be postable.
  • On the second attempt I only used 4.5 cups of water for 2 cups of dry wheat berries.  That actually slowed the cooking time.  Next time around I should use a full 6 cups for 30 minutes, and reserve the broth for later cooking.


Cumin rice and curry-roasted potatoes, simultaneously, experiment 1 — Ninja Speedi

by Don  

This recipe flows much more smoothly if you actually do the mise en place.  No, don’t ask me what that is.  You are a grown-up.  You know how to use the internet.

Ingredients

Cumin rice

  • ½ tsp black cardamom seeds (or 2 pods)
  • 1 tsp cumin seeds
  • ¼ tsp of ground cinnamon
  • 1 cup of long-grained rice
  • ½ tsp salt
  • ½ tsp garam masala
  • ¼ tsp chili powder
  • 1 tbsp of ghee or oil of choice
  • 2 bay leaves
  • 2 ½ cups of water

Curry-roasted potatoes

  • 3 medium russet potatoes, peeled and cut into 1-inch cubes
  • 1 tablespoon olive oil
  • ½ teaspoon sea salt
  • 1 teaspoon yellow curry powder
  • ¼ teaspoons ground ginger
  • ¼ teaspoon sweet paprika powder
  • ¼ teaspoon garlic powder
  • ¼ teaspoon course ground pepper
  • Juice of 1 small lime

Method

  1. Place cardamom and cumin seeds in a tiny bowl.
  2. In a separate small bowl place the rice’s ground spices.
  3. In a medium-size bowl put the potatoes and olive oil.  Sprinkle in the potatoes’ ground spices.  Toss together.
  4. Place the ghee in the Speedi pot on “sear/saute” level Hi5.  
  5. When the ghee seems hot, pour the cumin and cardamom in.  Cook them until the cardamom or cumin becomes fragrant, or the cumin starts to brown just a bit, whichever comes first.  I usually keep my eyes open for where the ghee puddles to place the spices, not on the most ghee-less spots.  That way the flavors meld into the ghee.
  6. Place the rice’s ground spices into the pot.  Mix and cook for a minute.
  7. Pour in the rice and stir until all the rice is covered with ghee.  
  8. Add the bay leaves and water.
  9. Add the crisper tray try to the upper level.  Pour the potatoes onto the tray in an even layer.
  10. Lower the lid and continue to cook at the same setting for 13 minutes.
  11. Turn off the Speedi.  Turn it on again.  Set it to “bake/roast” at 390°F for 11 minutes.
  12. Turn off and and put in serving dishes.  Squeeze the juice of the lime over the potatoes.

Note

Next time add 1 cup of raisins to the rice while it’s cooking, and use 1 tbsp of curry powder with the potatoes.  Consider also adding half a cup of shredded carrots to the rice.

Boiled rice and roasted potatoes, simultaneously, perfected — Ninja Speedi

by Don  

Ingredients

  • 2 cups of long-grain rice
  • 2 and 1/2 cups of water
  • 2 teaspons of "Better than Bouillon" brand chicken or mushroom base
  • 3 medium-size potatoes, cut into 1-inch cubes
  • 1 tablespoon of olive oil, or, what the heck 2 tablespoons
  • Onion powder
  • Garlic powder
  • Black pepper
  • Salt
  • Dry chives
  • Dry thyme

Method

  1. Place rice, water and bouillon base in the pot.
  2. In a separate bowl toss together the potatoes, olive oil, and the spices.  I mostly don't measure.  For your first try a teaspon of garlic powder and half a teaspoon of the other spices.  After making this recipe several times, your self-respect will grow and you will mock the precise directions, thinking, "Hah, as if I really needed that beginner advice !
  3. Place crisper in upper position.  Place potatoes on crisper.
  4. Close the cover and set the Speedi to "saute/sear" for 13 minutes.  Don't bother to warm up.  You will need a separate timer; there is no auto-shutoff for this function.  Start.
  5. Set the Speedi to "bake/roast" for 11 minutes at 390°.  Start. 

Notes

Potatoes and rice were both perfect.

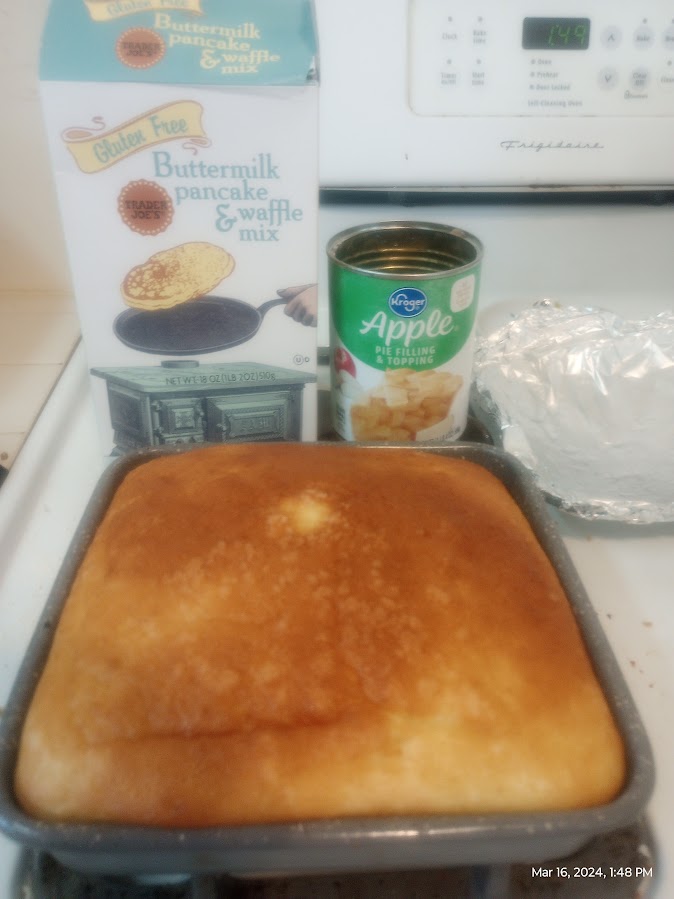
Gluten-free apple cobbler — Ninja Speedi

by Don  

Ingredients

  • 3 eggs
  • 3/4 of a cup of water plus 6 tbsp
  • 6 tbsp of melted butter
  • 2 1/4 cups of "Trader Joe's" gluten free buttermilk pancake & waffle mix
  • One 20-oz can of apple pie filling


Method

  1. Mix eggs, water and butter together.
  2. Mix in pancake mix.
  3. Spray a 7" x 7" pan with cooking oil.  Pour pie filling in pan.  Top with batter.
  4. Cook in the Speedi on "steam/bake" for 17 minutes at 315°F


Notes

I used a triple batch of batter this time (2 1/4 cups of dry ingredients).  That was probably too much.  Next time try a double batch, mutatis mutandis, and, maybe after that, a single batch.

Apple dump cake — Ninja Speedi

by Don  

Ingredients

  • One 20-oz can of applie pie filling
  • One 15.25-oz box of yellow cake mix
  • One stick (one half cup) of melted butter

Method

  1. Pour pie filling in and 8" x 8" cake pan.  Pour cake mix over the filling.  Pour melted butter over the cake mix.
  2. Pour 2 cups of water in the pot.  Place crisper tray in bottom and cake pan on the try.
  3. Stee the Speedi to steam/bake at 315°F for 17 minutes. 
  4. Let the cake cool for 15 minutes before eating.

Notes

While this came out edible, I wasn't impressed.  I might serve it if it were for a bunch of kids with a sweet-tooth.  (Or would that be a bunch of kids with sweet-teeth?)

Next time around, I think I'll try the cake part in two layers.  The section above the filling will be made with half the box's stated amount water with half of the dry ingredients and maybe one egg.  The upper layer will be half of the dry ingredients with the butter poured over it.

Roasted potatoes and white rice — Ninja Speedi, first attempt

by Don  

Ingredients

  • 2 cups of long-grain rice
  • 2 and 1/2 cups of water
  • 2 teaspons of "Better than Bouillon" brand mushroom base
  • 3 medium-size potatoes, cut into 1-inch cubes
  • 1 tablespoon of olive oil, or, what the heck 2 tablespoons
  • Onion powder
  • Garlic powder
  • Black pepper
  • Salt
  • Dry chives
  • Dry thyme

Method

  1. Place rice, water and mushroom base in the pot.
  2. In a separate bowl toss together the potatoes, olive oil, and the spices.  I mostly don't measure.  For your first try a teaspon of garlic powder and half a teaspoon of the other spices.  After making this recipe several times, your self-respect will grow and you will mock the precise directions, thinking, "Hah, as if I really needed that beginner advice !
  3. Place crisper in upper position.  
  4. Close the cover and set the Speedi to "steam/bake" for 8 minutes.  It'll take probably 20 minutes for it just to go through the "steam" phase.

Notes

I'm cooking this right now, and my house smells like heaven.

This almost turned out right:  the rice was just a bit overcooked on the bottom and didn't come loose as nicely as one would want.  Next time instead of "steam/bake" I'll try 10 minutes on "sear/saute" and then 8 minutes on "bake/roast."

Attempt 2

Changes:

  • 2 cups of water
  • 10 minutes on "sear/saute" Hi5 with the lid closed
  • 8 1/2 minutes on "bake/roast" at 390°

Result

Rice was edible but slightly underdone, and potatoes were slightly underdone.  Next time around I should try 2.5 cups of water, 13 minutes on sear/saute, and then 9 minutes on bake/roast.

Attempt 3

Changes:

  • 2.5 cups of water
  • 13 minutes on "sear/saute" Hi5 with the lid closed
  • 9 minutes on "bake/roast" at 390°

Result

Rice was perfect, and potatoes were slightly underdone.  Next time around I should try 2.5 cups of water, 13 minutes on sear/saute, and then 11 minutes on bake/roast. There is some question in my mind whether I should raise it to 2.75 cups of water.

Attempt 4

Changes:

  • 2.5 cups of water
  • 13 minutes on "sear/saute" Hi5 with the lid closed
  • 11 minutes on "bake/roast" at 390°

Result

Potatoes and rice were both perfect.

Curried broccoli with carrots and sweet red bell peppers — Ninja speedi

by Don  

Ingredients

  • Two 13.5 oz cans of coconut milk, plus half a can of water to rinse them out
  • One heaping tablespoon of Mae Ploy Thai Green Curry Paste... the heapinger the better
  • One freakishly enormous carrot, the kind you can get in an Asian grocery store in the US (or any farmer's market in Kyrgyzstan), sliced into diagonals cuz we're fancy
  • A pound or two of frozen broccoli flowerets
  • 3 small red bell peppers (or two medium ones), cut into one-inch chunks

Method

  1. You will not use the crisper tray for this recipe.
  2. Pour coconut milk, water, curry paste, and carrots into the pot.  Set to "sear/saute" at Hi5 with the pot covered for 10 minutes.
  3. Pour in enough brocolli flowerets to fill the pot.  Continue at same heat uncovered for 10 minutes.
  4. Check to see whether the brocolli is tooth-ready, per your preferences, but I think it's best to leave the broccoli with just a bit of crunch.
  5. Toss raw bell peppers with everything else.  Yup, we want those in there raw.

Notes: 

You can serve it over rice, just like any other unimaginative chef, or better yet in a bowl as a soup, or, since we want to explore other grains, serve it over boiled wheat berries (for digestive health) or boiled millet or even quinoa, but if you use the latter make sure you look up how to pronounce.  For years I said "quinn-OH-uh."  Pretty damn embarrasing.

This is one of those recipes that really prove that simple cooking can be excellent.

Vanilla cupcakes with a cherry on top — Ninja Speedi

by Don  

Ready for the neighbors!  Hospitality blitz!

Prepare muffin mix per box instructions using the standard airfryer adjustment (-25°F of stated baking temperature and -25% of stated cooking time).  The rest is obvious.

If this recipe doesn't prove I'm gay, I don't know what does.


Aquafaba

by Don  


This starchy bean liquid is your ticket to vegan meringue, creamy dips, and more.

Source: Bridget Hallinan

We've sung the praises of leftover jarred brine — pickle brine, olive brine, caper brine, you name it — and why you should save it and use it to give your cooking a flavor boost. Well, there's another oft-discarded ingredient you need to save: this time, it's in your can of chickpeas. Enter aquafaba, the liquid chickpeas are canned in. While you might typically drain it off before using the chickpeas, it's actually a pretty handy ingredient to have, particularly in vegan cooking and/or egg-free cooking. Here's what you need to know about it, with tips from Food & Wine Food Editor Kelsey Youngman.

What Is Aquafaba, Anyway?

Aquafaba is starchy water leftover from cooking legumes — like black beans, or chickpeas, or kidney beans. But for the purpose of this article, we're going to focus on chickpea liquid, which is what is commonly used as a substitute for eggs (we don't recommend using another type of aquafaba here). Why? Youngman says chickpea aquafaba is of the best quality, has the right amount of starch in the liquid, and doesn't have a strong flavor.

Should You Make Your Own Aquafaba? How Do You Make it?

This is something we don't recommend, either. While you can make aquafaba by cooking your own chickpeas, Youngman says she's found that the store-bought version you'd get in a can of chickpeas is starchier and works better. Plus, it's easier — all you have to do is open the can, strain out the chickpeas, and you're done.

How to Cook with Aquafaba

Use this ratio when substituting aquafaba for eggs: three tablespoons of aquafaba for one egg, two tablespoons for one egg white, and one tablespoon for one yolk. Youngman explains that what makes aquafaba such a great egg substitute is its ability to trap air. When you whip it and aerate it, it forms a foam that holds its shape. That's why it's often used to make vegan meringue. If you add a little sugar and cream of tartar, treating the aquafaba like egg whites, it will beat into a glossy, stable meringue that you can use to make dishes like meringue cookies, an elegant topping for a tart, or pavlova.

Youngman also says that aquafaba can give structure and stability to dishes, and keep the crumb light in a baked good. She recommends trying it as an egg substitute in dishes like coffee cake, muffins, and banana bread. Aquafaba is also used to make the lemon frosting in these Blackberry-Cardamom Cupcakes from Food & Wine Associate Food Editor Paige Grandjean.

Another fun way to use aquafaba? This French 75 Dip, which comes from Marc Rose of White Limozeen in Nashville. The dip is inspired by the flavors of the classic cocktail — you'll find ground juniper berry and lemon in the ingredient list — and uses aquafaba as the base to help achieve a creamy, whipped texture. Or, try it in this Plum Gin Fizz as a substitute for the egg white.

How Long Does Aquafaba Last?

If you have any leftover aquafaba, transfer it to an airtight container and keep it in the fridge or freezer, depending on when you're planning on using it. Youngman recommends keeping it in the fridge no longer than a week; in the freezer, about a month. She says you can try freezing it in individual portions via an ice cube tray, so you can defrost as needed. That way, delicious vegan treats are only a few steps away.

1 2 4 5 ...6 ...7 8 9 10 11 12 ... 35